
Homemade Ladi Pav and Buns
Homemade Ladi Pav and Buns are soft and delicious buns that make a perfect meal when paired with bhaji. These eggless ladi pavs are surprisingly simple to make and tastes so much better than the store-bought ones.
Servings: 12
Calories: 180kcal
Ingredients
YEAST PREPARATION
- 1 packet Active dry yeast (2-1/4 teaspoon)
- 2½ tablespoons Sugar
- 3 tablespoons Water
- 3 teaspoons Milk
PAV DOUGH - THIS RECIPE YIELDS 12 PAVS
- 3 cups All purpose flour
- 1 teaspoon Baking powder
- 1½ teaspoons Salt
- 3 tablespoons Butter
- 2 tablespoons Oil
- 1 cup Water or Milk
- 1 tablespoon Butter (for basting)
BRUSH UNCOOKED PAVS WITH
- 2-3 tablespoons Milk
Instructions
YEAST PREPARATION
- Assemble: all the ingredients. For few seconds warm up milk, water, and sugar. Milk and water should be LUKEWARM and not warm. Take it off the flame and mix in the yeast.

- Whisk it well.

- Let it sit for 10 minutes. After 10 minutes it will look like a thick creamy paste. This proofing procedure shows that yeast is alive and active.

- If the yeast doesn't foam or bubble as shown in the pic, please discard the yeast and start over Do not continue with flat yeast as it will result in dense and sticky pav.

KNEAD THE DOUGH
- In a bowl combine flour with salt and baking powder. Mix it well. Slowly and gradually add water/milk. PROTIP - Do not add all the water at once. Add water as needed, you might not need all the water. If the dough doesn't bind, add an extra tablespoon of water.

- Time to add yeast.

- Add yeast and mix until combined.

- Add butter and oil to the flour. Mix until fully incoprporated.

- Knead the dough for 5-10 minutes.

- The dough should be smooth. Not sticky.

- Transfer the dough to a bowl. Cover the dough with a wet towel.

- And set it in a warm place for at least 1- 2 hours. The dough will double in size. The dough should be all airy and puffed up.

- Remove the dough from the bowl, dust it with some flour and start kneading the dough. This step is necessary – if the dough is not kneaded well, pav will turn out dense. Dough elasticity and gluten formation are enhanced by kneading.

ASSEMBLE PAV
- Divide the dough into equal parts. Form the dough into smooth circular shape. Arrange the pavs in a greased tray.Leave some space between each dough ball and provide them some room to spread as they rise.

- Cover them with a wet towel and set it in a warm place for at least 30 minutes. Lift the wet towel to see them doubled in size.

- The pav will double in size. If they are not doubled in the desired time- let the pav rise for another 30 minutes. Preheat oven at 400 degrees F.

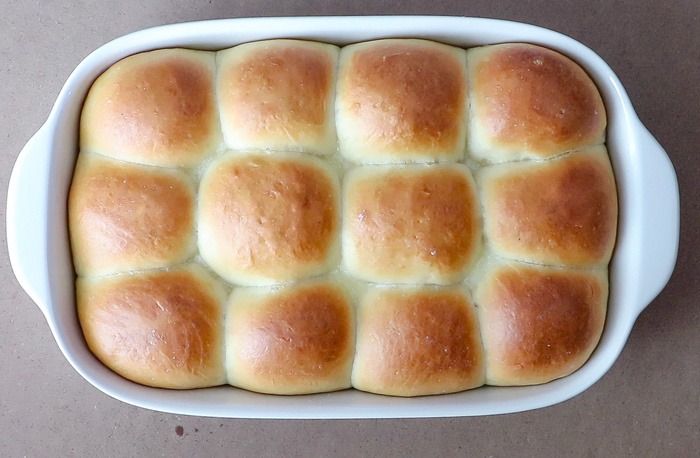
- Brush pavs with milk and... Bake them in a preheated oven (400 degrees F) for 10 -15 minutes or until light brown from the top. It took me 12 minutes to lightly brown the pavs and a minute on BROIL 9which was closely monitored).

- Apply butter to the freshly baked pavs and it will soften the top.

- Run a butter knife around the edges to loosen up the pavs. Run the knife a couple of times and make sure no sides are attached to the baking pan. This way, the pav will toss right out of the baking pan when inverted.

- If the pavs are allowed to sit for long in the baking tray they will turn moist at the base due to heat condensation.

- When pressed, the pavs will spring right back into it's shape.

- Once you start making this recipe at home you will stop buying market buns - easiest and tastiest bun recipe ever!!

- Using the same recipe you can make homemade buns - baking time will vary 18-20 minutes. Sprinkle them with sesame seeds.

PAV WITHOUT OVEN
- Add 1½ cups of sand at the bottom of a pan or pressure cooker. Place a strainer over the sand.

- Grease a steel container. Arrange pavs in the greased container. Place pavs over the strainer...

- Cover it with the lid. Maintain the heat - it should be medium. If using a pressure cooker, then remove the rubber gasket from the lid and close the cooker.

- After 30 minutes of total cooking - well-cooked pavs. Carefully remove them from the pan.

- Let it cool down completely and then run a knife across the pan to loosen the pavs. Flip it over. Brush with melted butter. Enjoy!! Beautifully crusted at the bottom and soft and velvety at the top.

Video
Notes
QUESTIONS AND QUERIES RELATED TO THIS RECIPE -
1. What kind of yeast do you use?
I have used active dry yeast for this recipe. If using Instant yeast - that needs to be added to the recipe directly. No proofing required.
2. What baking tray to be used for baking pavs?
Any oven resistant dish or baking tray is good for baking pavs. You can use glass, baking trays and foil trays.
3. On which rack should I keep my baking tray?
The tray should be kept at the middle rack for brown pavs.
4. Pavs turned hard and no brown color on top?
For softer pavs - Preheat oven for 15- 20 minutes before placing pavs. Bake them for 10-12 minutes. If pavs are not brown in the given time frame, put them closer to the heating element or BROIL for FEW SECONDS until the top browns up and remove them immediately. Overcooking will result in hard pavs.
5. How to give the pavs a round shape?
Please follow this post for step by step recipe to shape the pav bread. http://www.ruchiskitchen.com/recipe/wheat-ladi-pav-recipe/
5. Why is my Pavs moist at the base?
Once pav bread is out of the oven, remove the pav from the baking tray and allow them to cool down on a wire rack. If allowed to sit too long in the baking tray they will turn moist and remain wet at the base due to heat condensation.
Pavs made in 2015-
 Pavs made in 2016-
 Pavs made in 2017 -
 Pavs made in 2018-
 Pavs made in 2019-
 Pavs made in 2020 -
Pavs made in 2016-
Pavs made in 2017 -
Pavs made in 2018-
Pavs made in 2019-
Pavs made in 2020 -
Nutrition
Calories: 180kcal | Carbohydrates: 27g | Protein: 4g | Fat: 7g | Saturated Fat: 3g | Cholesterol: 10mg | Sodium: 327mg | Potassium: 73mg | Fiber: 1g | Sugar: 3g | Vitamin A: 117IU | Calcium: 21mg | Iron: 1mg